Launching your own blog for business or personal purposes is a way to give yourself a new platform to express thoughts and opinions or to share, promote and sale products and services you want. Regardless of your reasons behind launching a new blog, doing so with WordPress is a highly recommended solution for sites of any kind.
In this WordPress blog creation guide, we list 5 easy steps to follow to create your own blog by yourself. It’s easy and simple, and you should be up and running in 10 minutes.
1. Create a Plan

Before you can launch a blog of any kind, creating a plan for your blog and understanding its purpose is extremely beneficial to achieving any level of success you have in mind. Ideally, if you’re reading this guide, you’ve already done this step – if not, there are a few things to keep in mind. First, consider the purpose of your blog and the target audience you want to reach.
Secondly, coming up with a creative domain name is a key factor to having success online, whether you plan on promoting products and services or if you are simply launching a content-based site. The more creative, original and memorable your domain is, the easier it is to attract new visitors who will recognize your brand with time and who will be genuinely interested in what you have to say or offer.
Tips for Registering a Domain
Prior to registering a domain, it is important to review all of the options you have available and the relevant names that are interesting and fit the type of blog you want to launch.
Consider the meaning of your blog and write down domain names you have in mind that would match your current site plans. Using a relevant name that is meaningful and easy to remember will also help to attract visitors even if they have never heard of your website in the past. Inserting a keyword that represents the content or information you have to offer on your blog can be useful for SEO, or search engine optimization purposes, but nowadays, it is more important to choose a name that will be brandable, so that it can one day be easily recognized as the authority in your niche.
2. Registering Your Domain
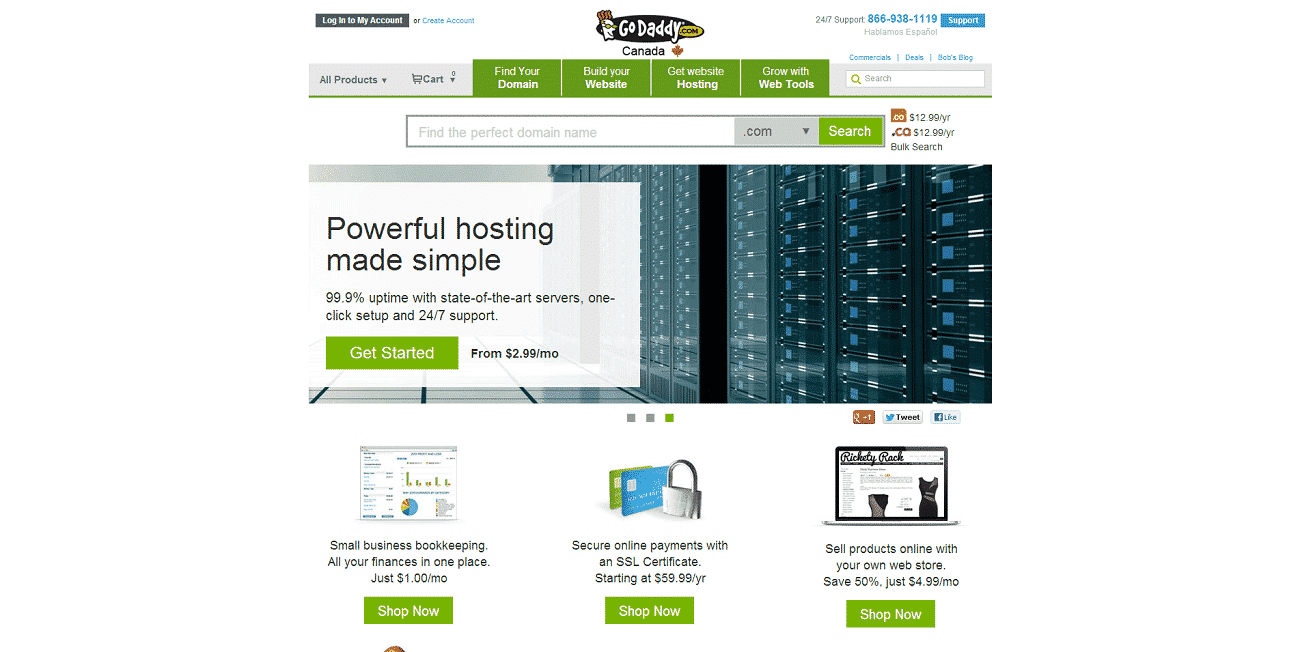
Registering your domain name is the first step to launching a blog online. You can register the domain name you have in mind first by visiting GoDaddy.com, one of the world’s leading domain name providers. Once you arrive on GoDaddy, you can search for your domain within the site’s domain search bar. Searching for the domains you are interested in on GoDaddy will immediately tell you whether or not you can purchase the domain due to availability or if it is already taken and registered by someone else. Checking the availability of a domain name is essential before you make any additional plans for your blog or website, especially if you plan to brand your site or make products with the name imprinted on them.
At this point, you can either purchase your domain name directly from GoDaddy, or go to step 3 to get your domain for free with your hosting account since you’re going to be needing one anyway. Indeed, you can register your domain name at the same time that you get a web hosting account for your new blog. By registering your domain with GoDaddy, you get to keep your domain name and web hosting accounts separate, with two different companies, which is something some people prefer. However, if you register your domain name with your web hosting company instead, your domain and hosting will be at the same company, and you will not have to pay for the domain name registration fee, thanks to a promo we’re able to offer at Step 3. Your choice.
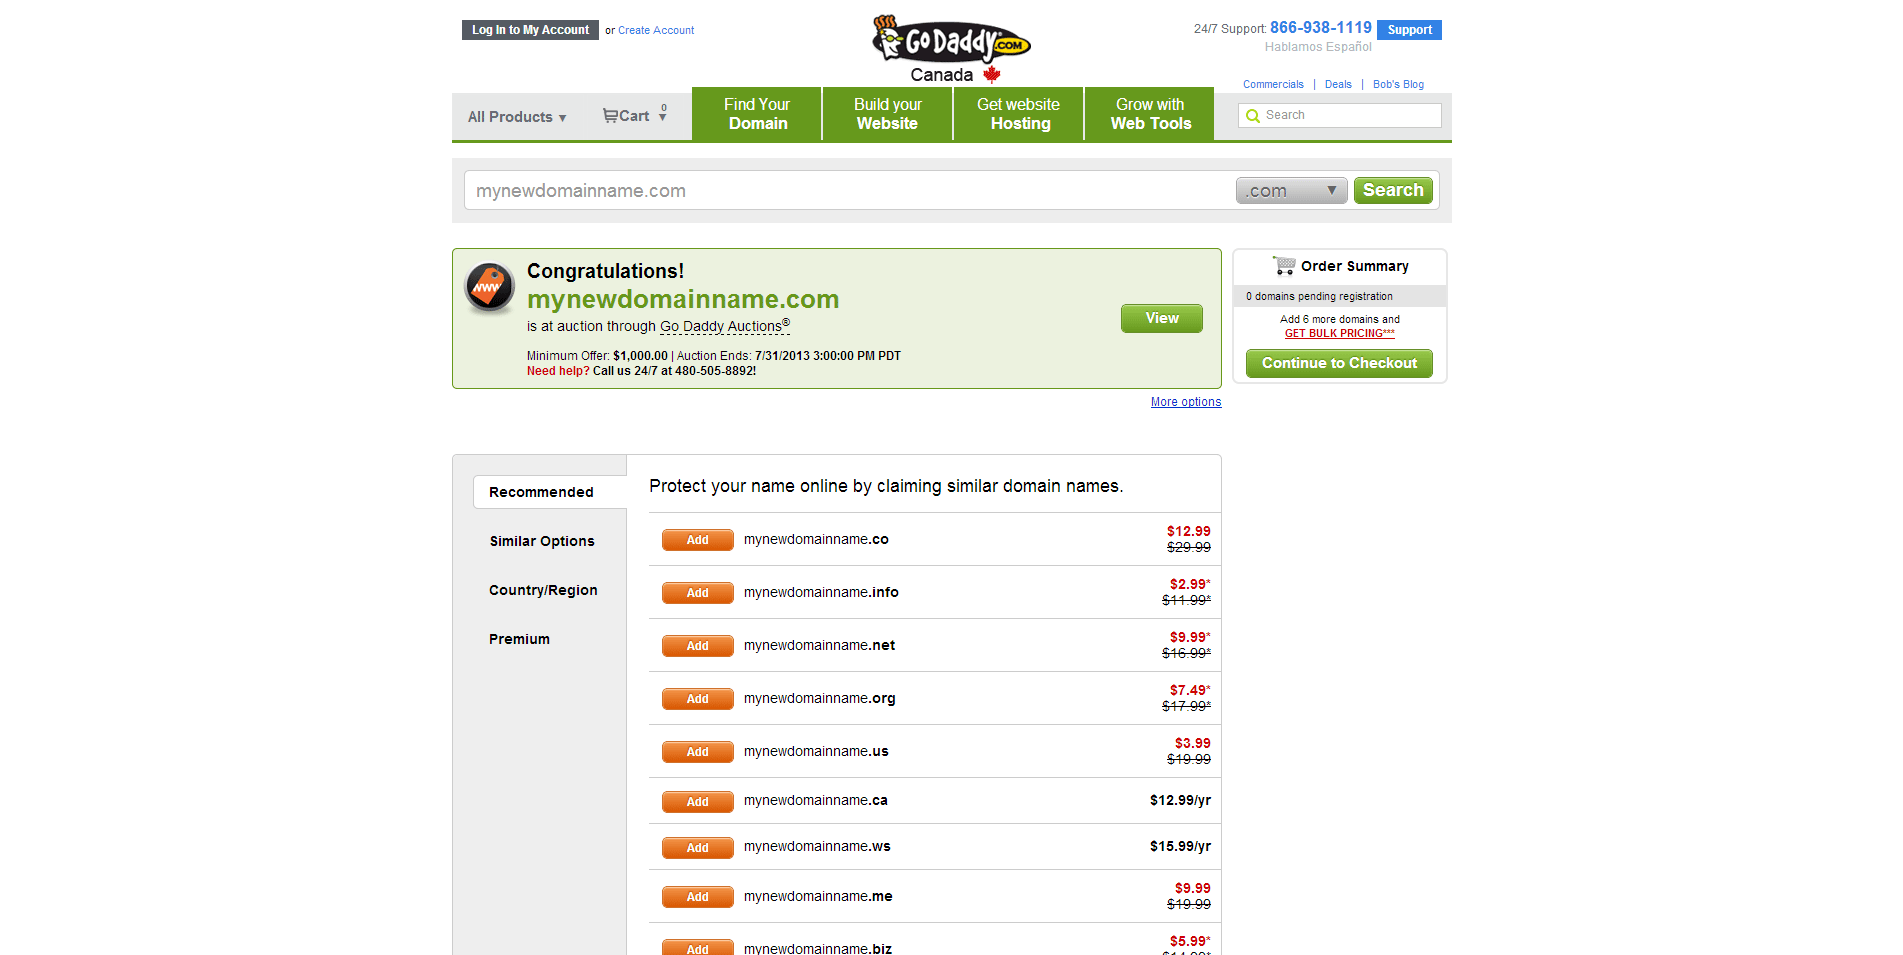
If you decide to register the domain with GoDaddy, once you find a domain name that is available, you can select the “Add” button, which will add the domain directly to your GoDaddy virtual shopping cart. Click “Continue to Registration” to begin the checkout process and to make the purchase of the domain you desire.
GoDaddy may present also some offers for hosting, for additional domains or for security features. If you are not interested in these deals, simply click “Continue to Checkout”, where you will be prompted to enter your payment details and information. Follow the on-screen instructions to complete your order and make your domain purchase. While GoDaddy is great for registering domain names, they are not our first choice for web hosting.
3. Hosting Your Blog
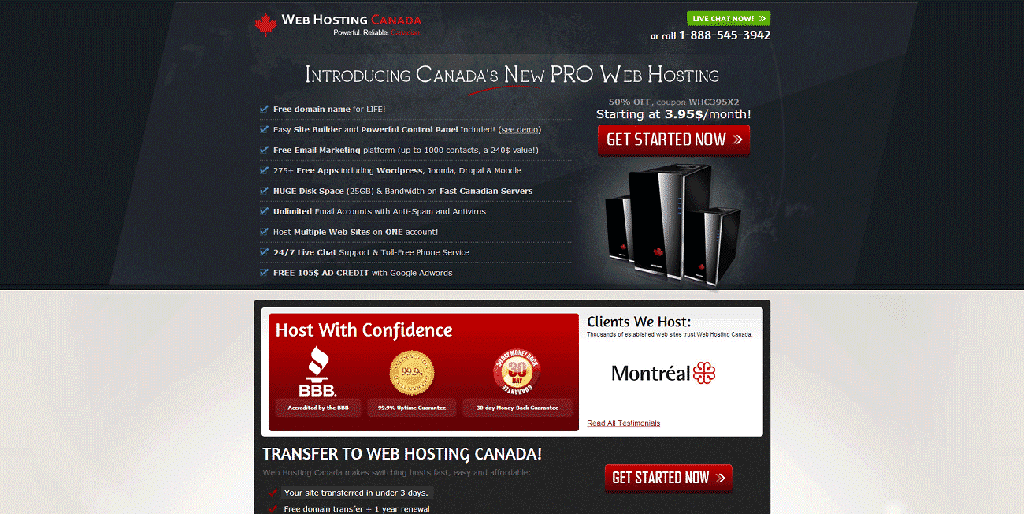
Next, purchasing a web hosting service is essential to begin adding content to your blog and website altogether. Choosing a web host such as WHC.ca is highly recommended if you are looking for an inexpensive, yet reliable hosting for your blog. We negotiated a special offer for our readers, so that their Professional web hosting plan will come out to $3.95 per month. If you’d like more information about them, please read the detailed Web Hosting Canada review we wrote about them.
To register your hosting account (and get a free domain name) on Web Hosting Canada, follow the following steps:
- Visit the Web Hosting Canada promo page, and simply click on “Get Started Now” to continue.
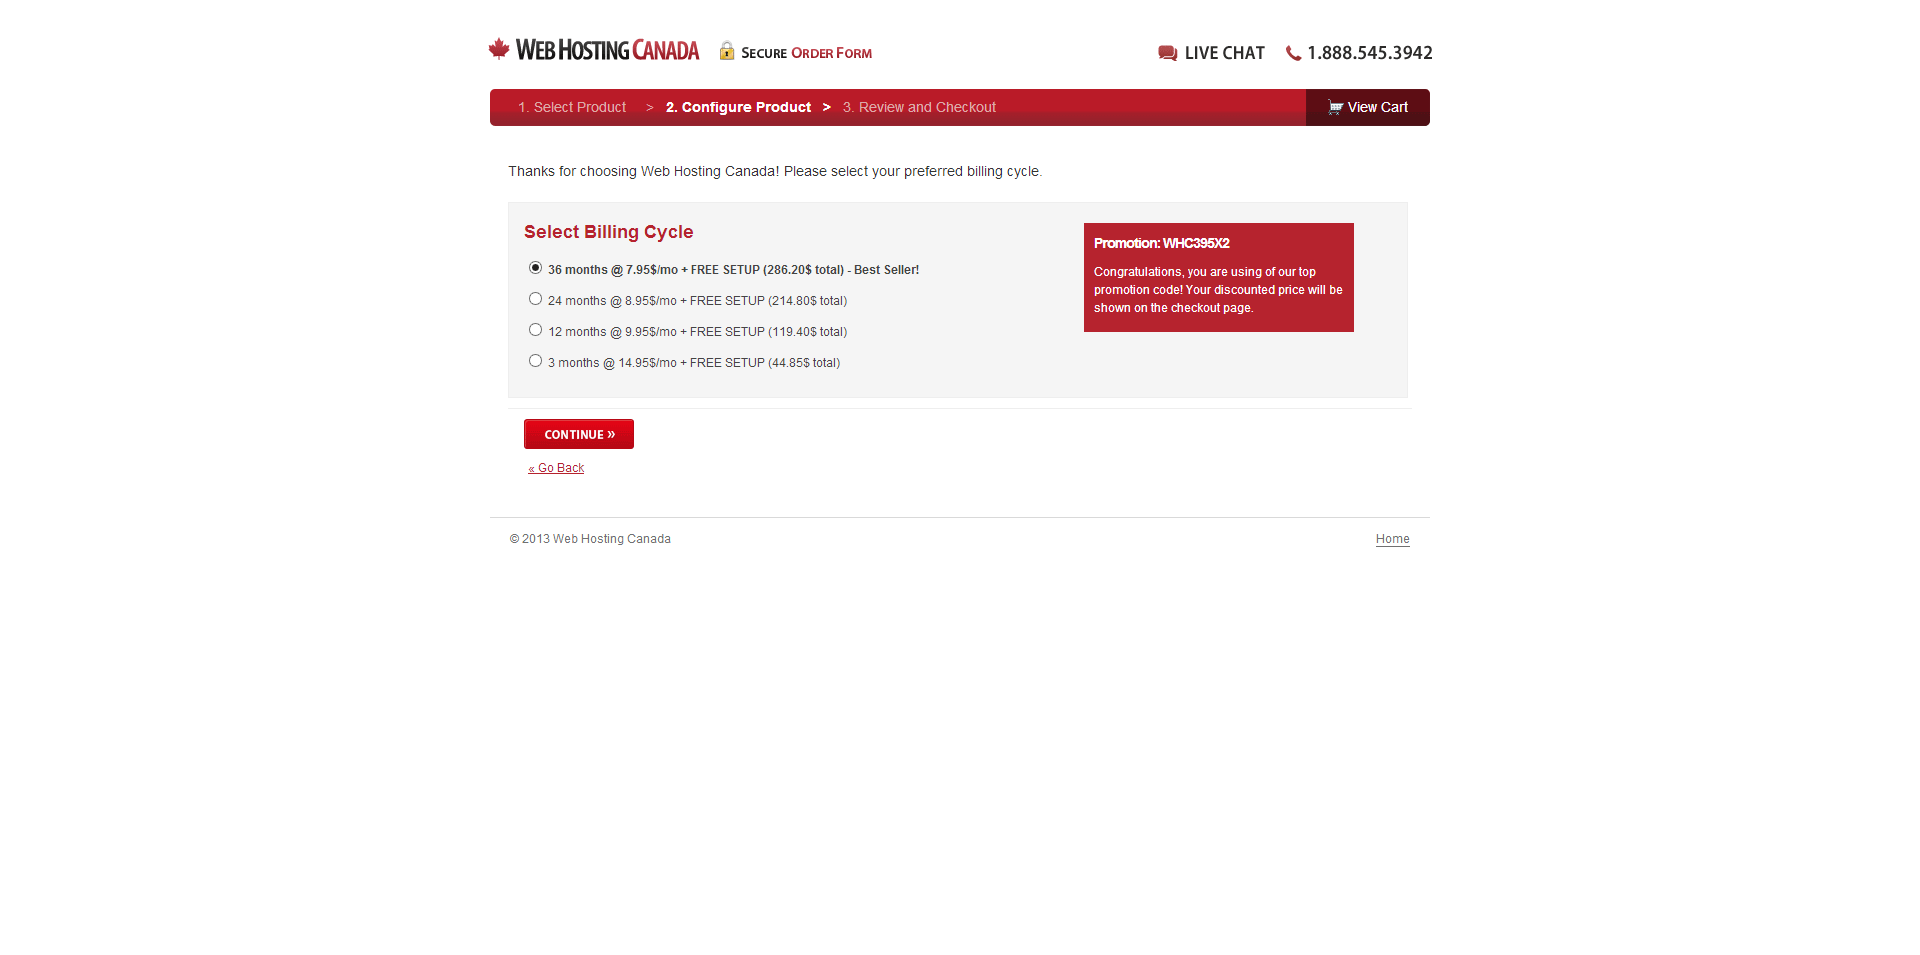
- Choose your Billing Cycle. You can choose between 3, 12, 24 or 36 months. To receive a free domain name, you must at least select the 12, 24 or 36 month plan. The price listed on this page is before the discount that will be applied and will be displayed at the end before you pay. You can click on “Continue“.
- Now, if you have already registered your domain name with GoDaddy at step 2, select “I do not want to Register a Domain Name now (you will be able to add one later)” and enter the domain name in question in the boxes.
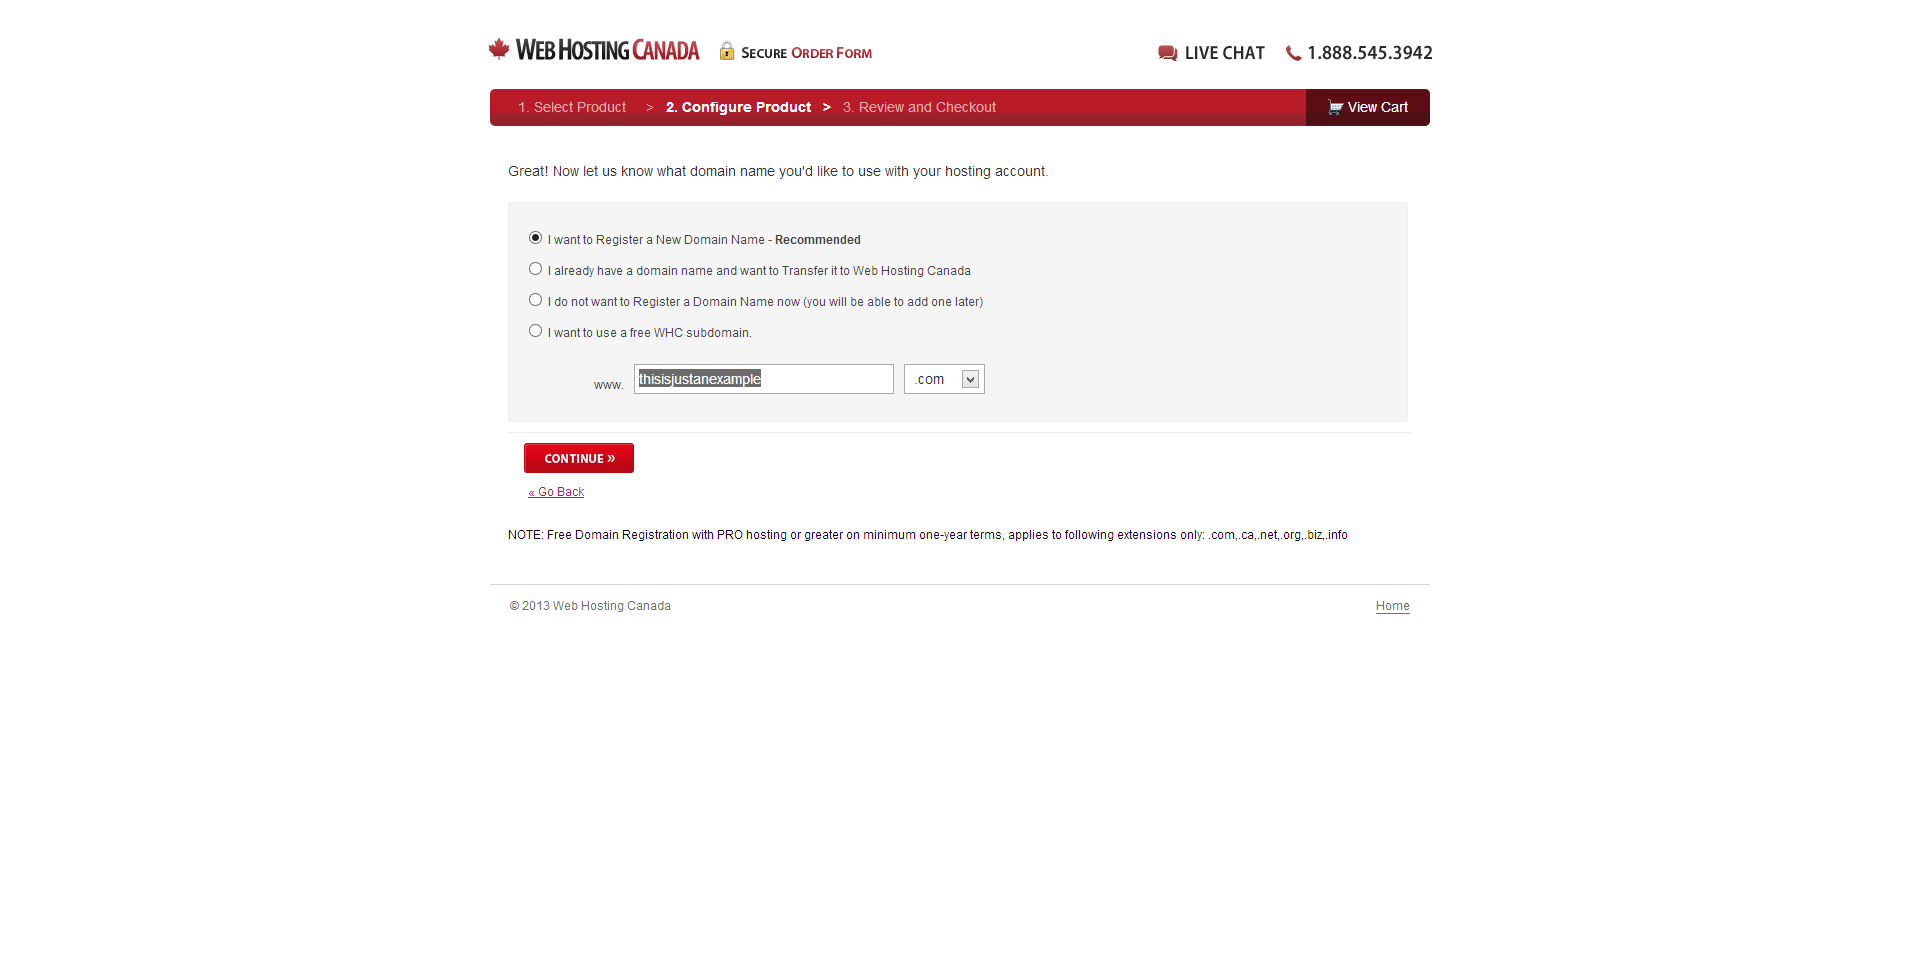
If you have not registered the domain name yet, and want to get it for free with your hosting account at WHC.ca, select “I want to Register a New Domain Name – Recommended” and enter the domain name you want to register in the box. Click on “Continue“.
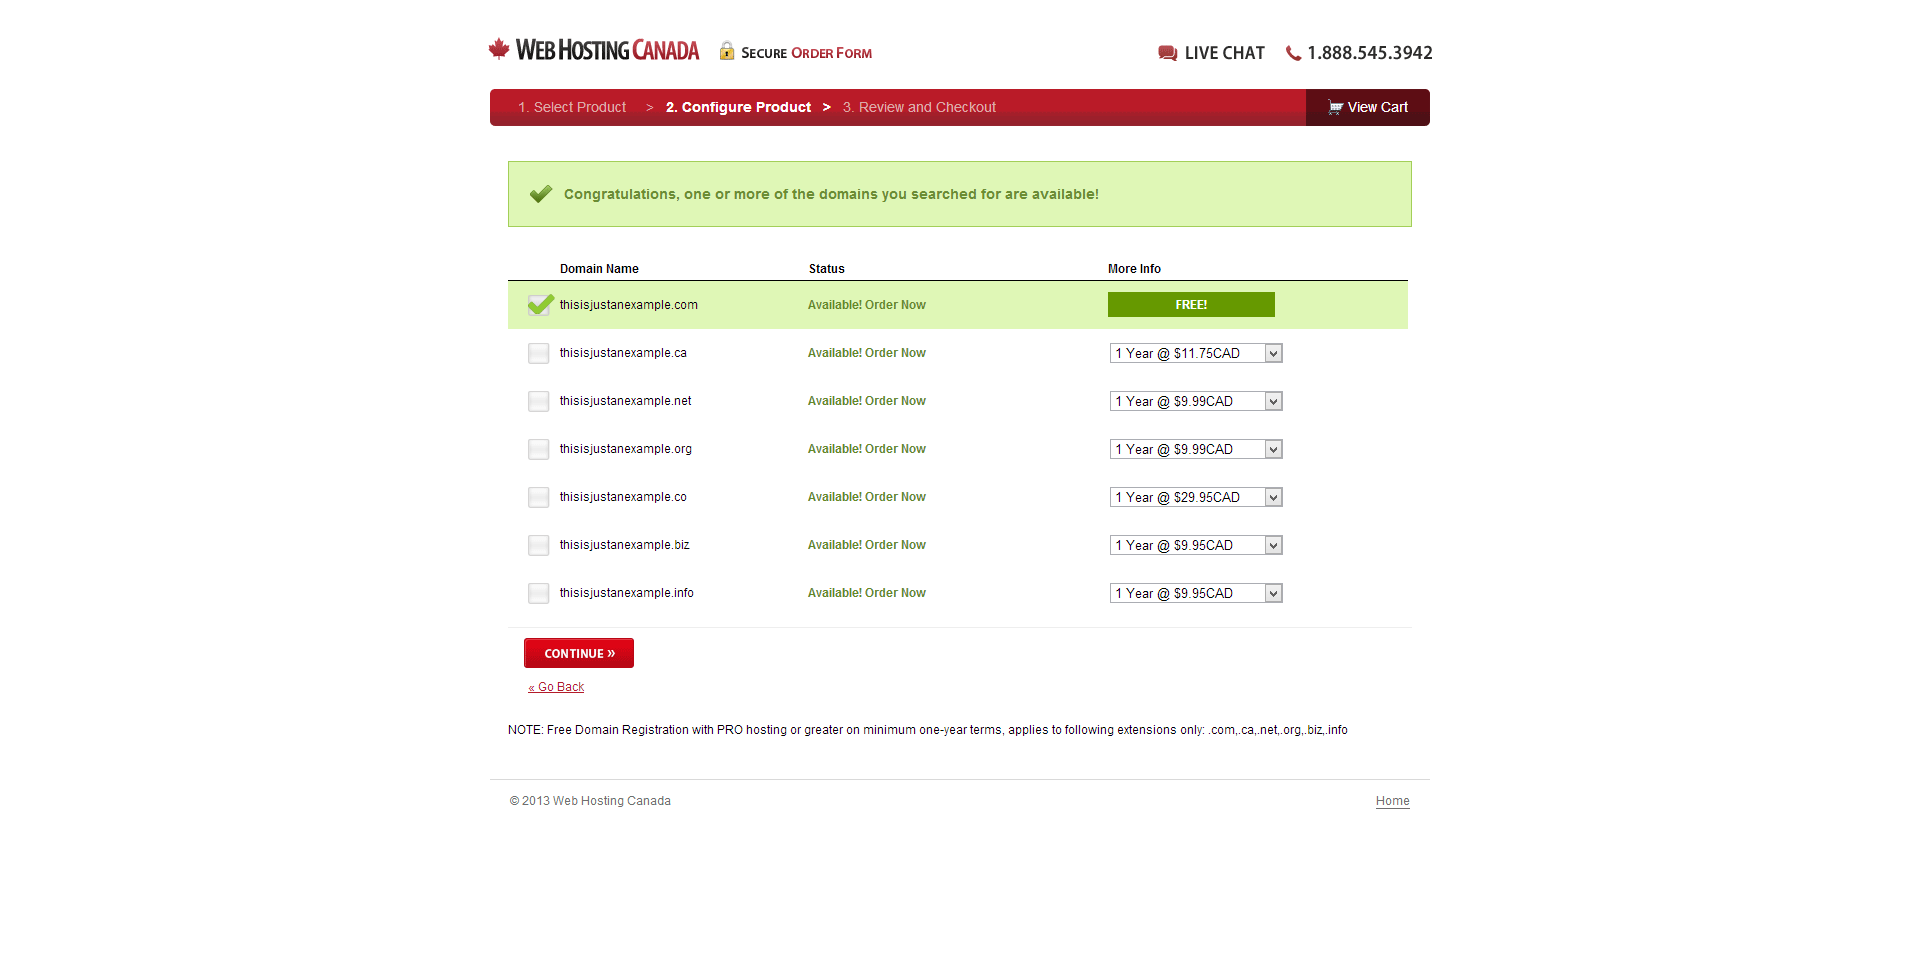
- If you are registering your domain name with Web Hosting Canada, the next page will confirm that your domain name is available and give choices to add other domain names if you like. Click on “Continue“.
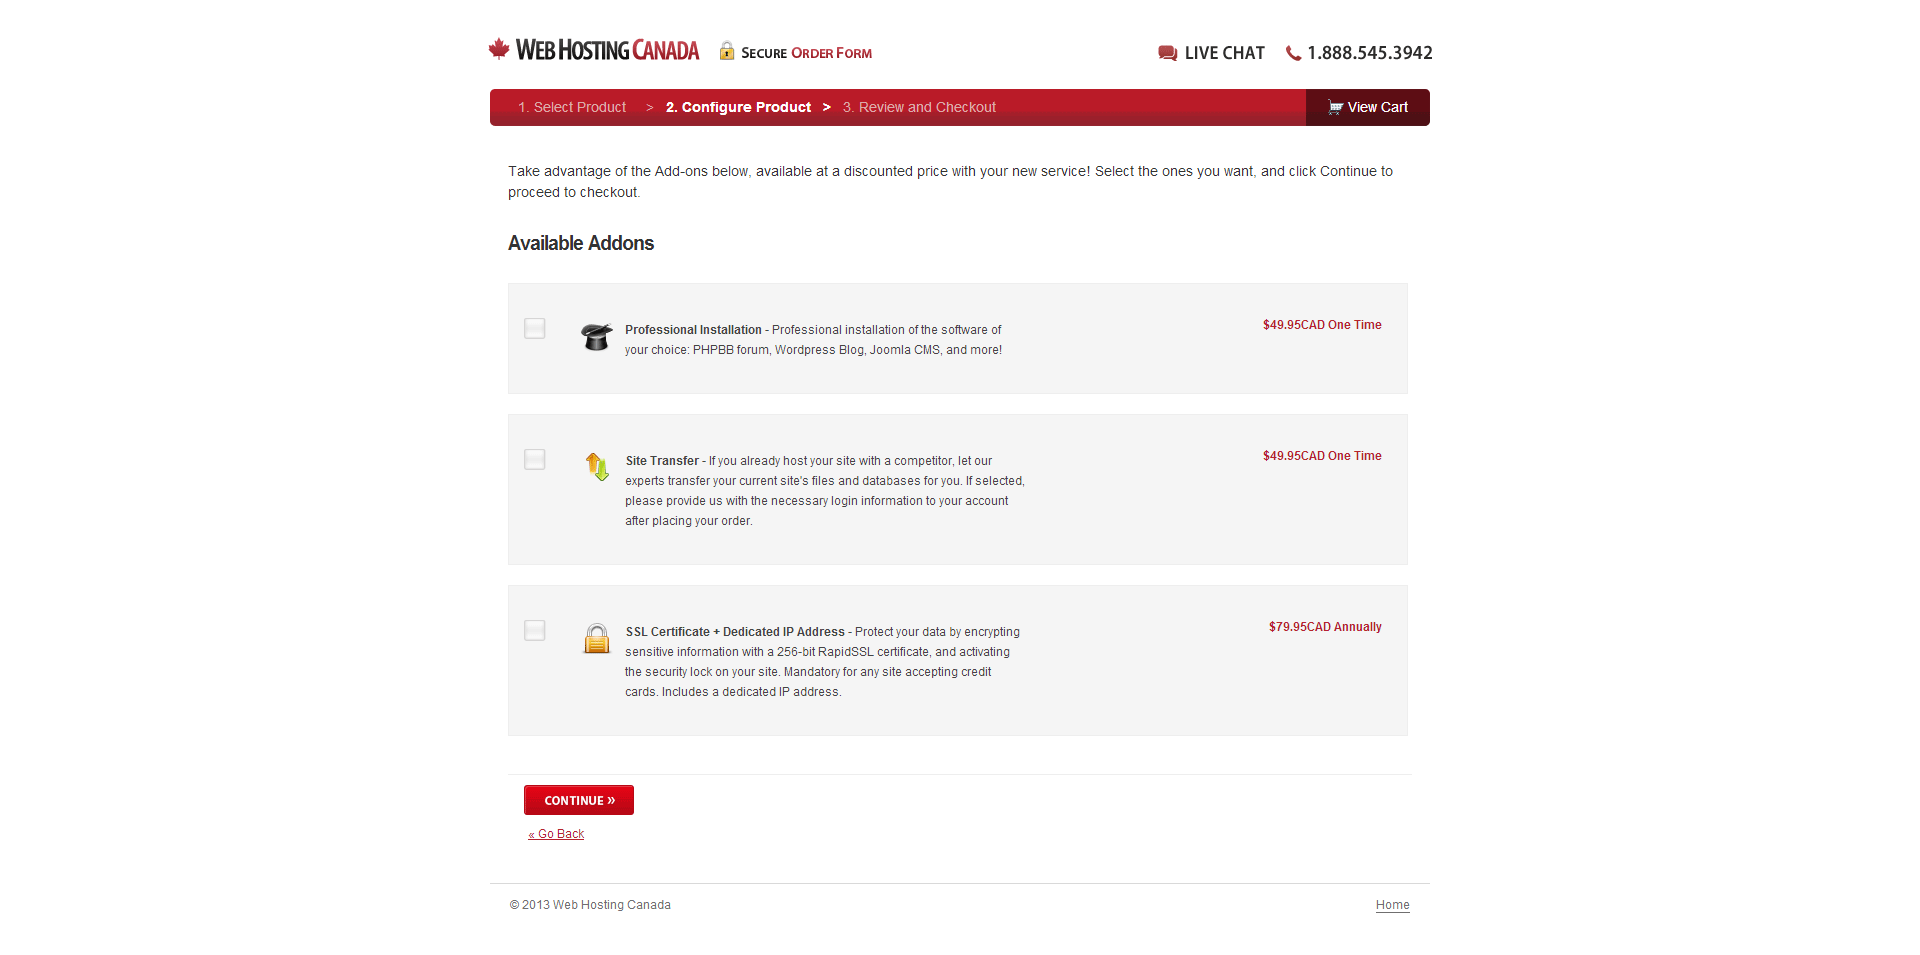
- You will be presented with a page with a list of addon features. At this time, the only addon that could be useful for us is the “SSL Certificate + Dedicated IP Address” if we plan on creating a WordPress site where we will sell services or products and will require to process financial transactions. If this applies to you, select it, otherwise skip this step. Click on “Continue“.
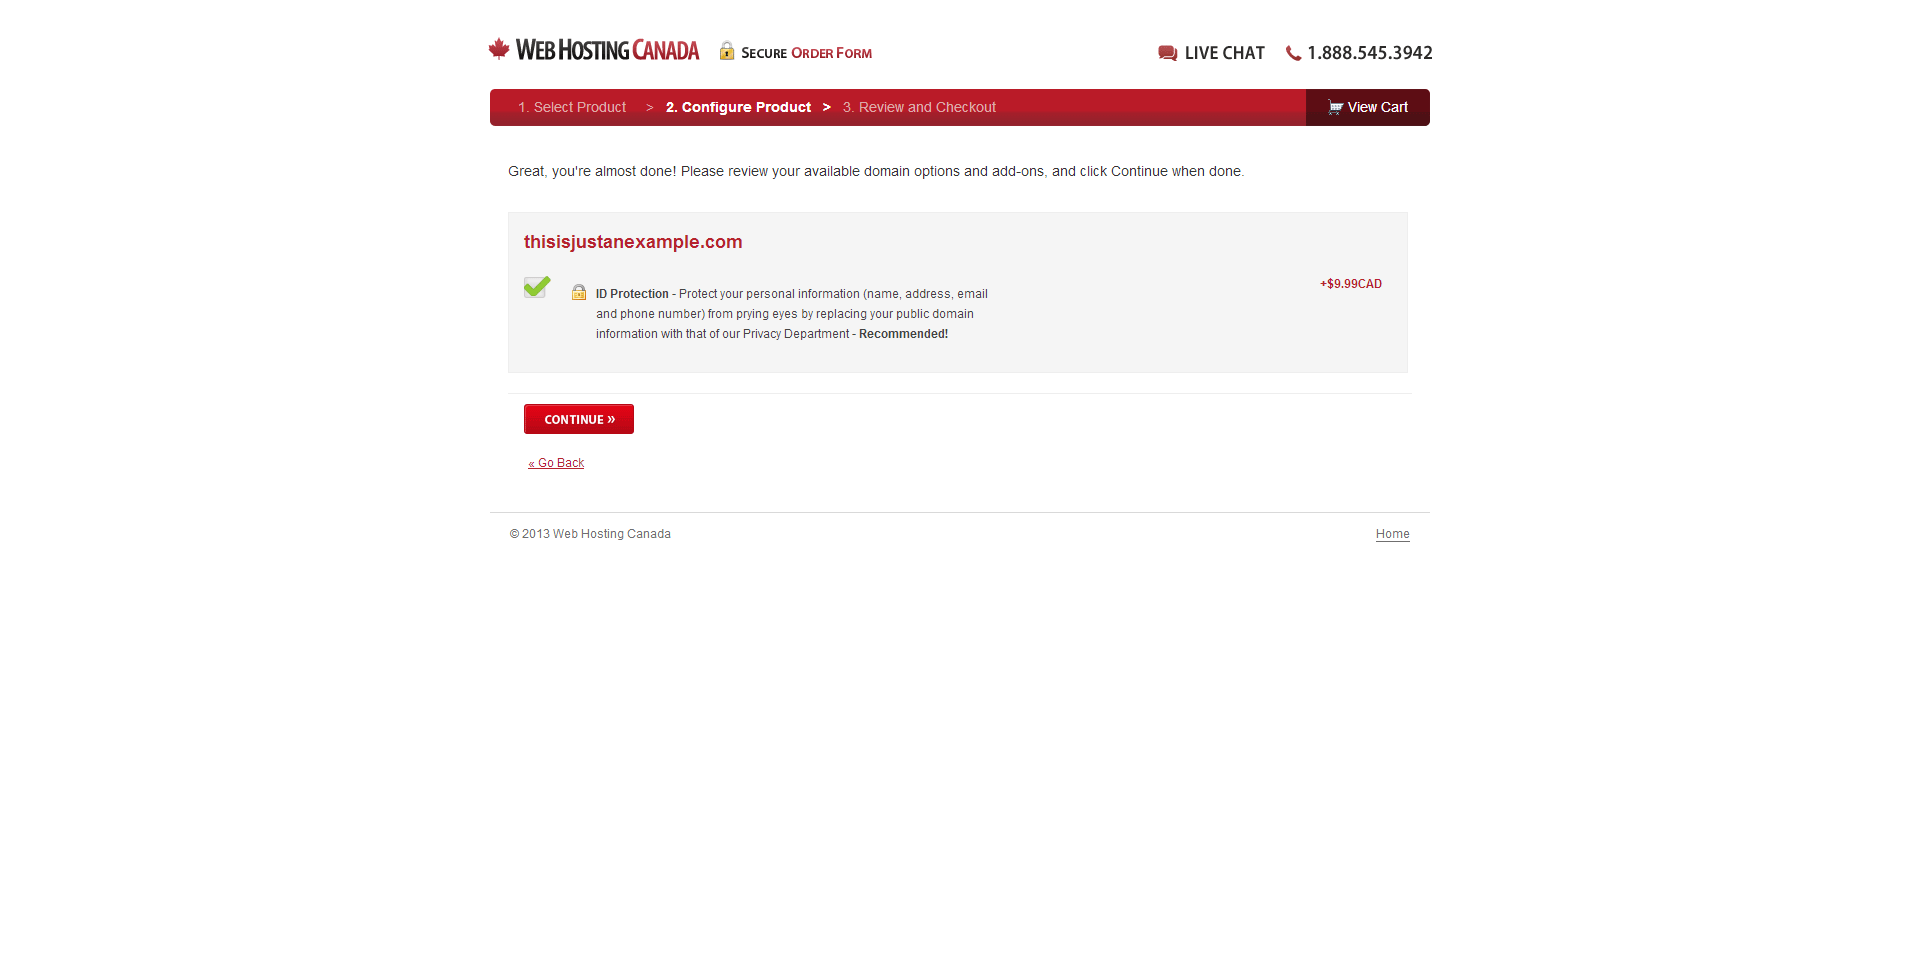
- Depending on the extension of your domain name, for instance .com, you will also have the option to add an “ID Protection” feature that will protect / hide your personal information (name, address, email and phone number) from the public. I always select this option. Click on “Continue“.
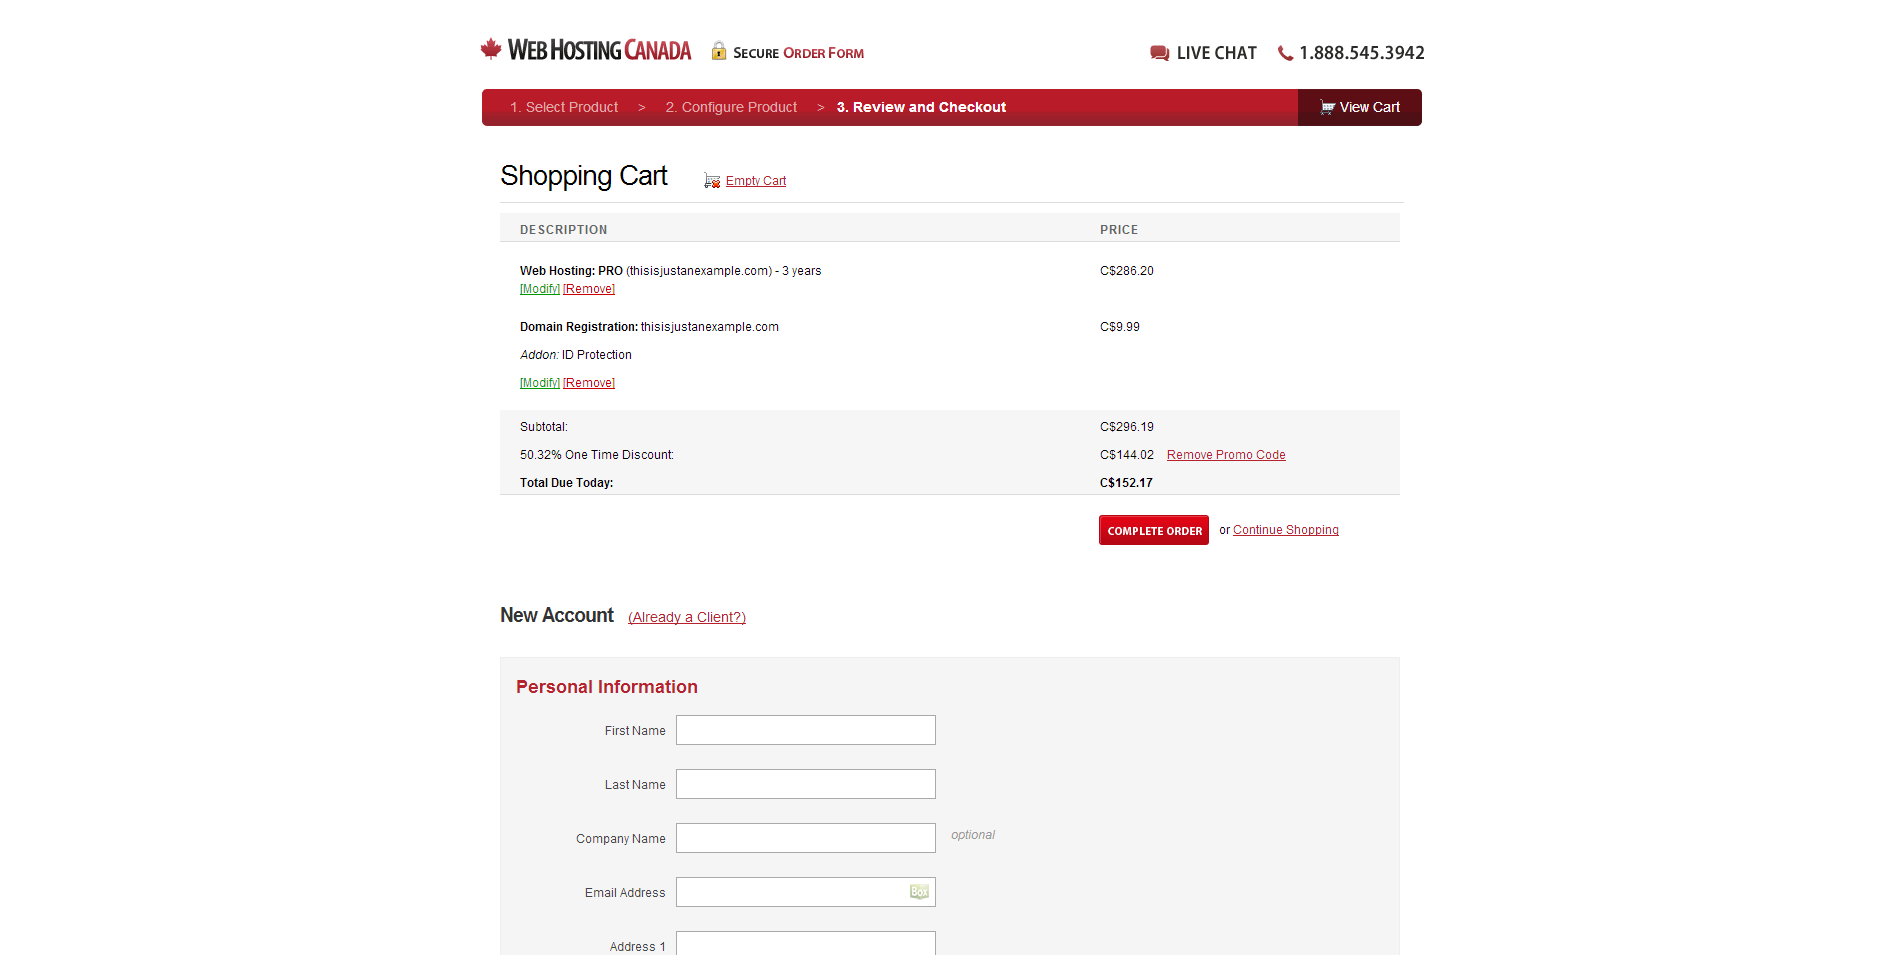
- Final page – it is time to checkout. Review your order, and make sure that your 50% discount has been applied. If you used the links on our page, the discount will be applied automatically. You must now enter your personal information and your payment info. You can pay by Credit Card, Paypal, Checks or Wire transfer / Interac (there will be delay for your account to be available if you choose one of the last two options). That’s it, pay and you will receive an email confirmation with your new web hosting account information.
Nameservers
If you registered your domain name with Web Hosting Canada, you can skip this part and move on to step 4. If you registered your domain name with GoDaddy at step 2, or with any other domain name registrar, you will have to connect your domain name with your Web Hosting Canada account to properly configure the domain on your hosting package. This is called configuring your domain nameservers.
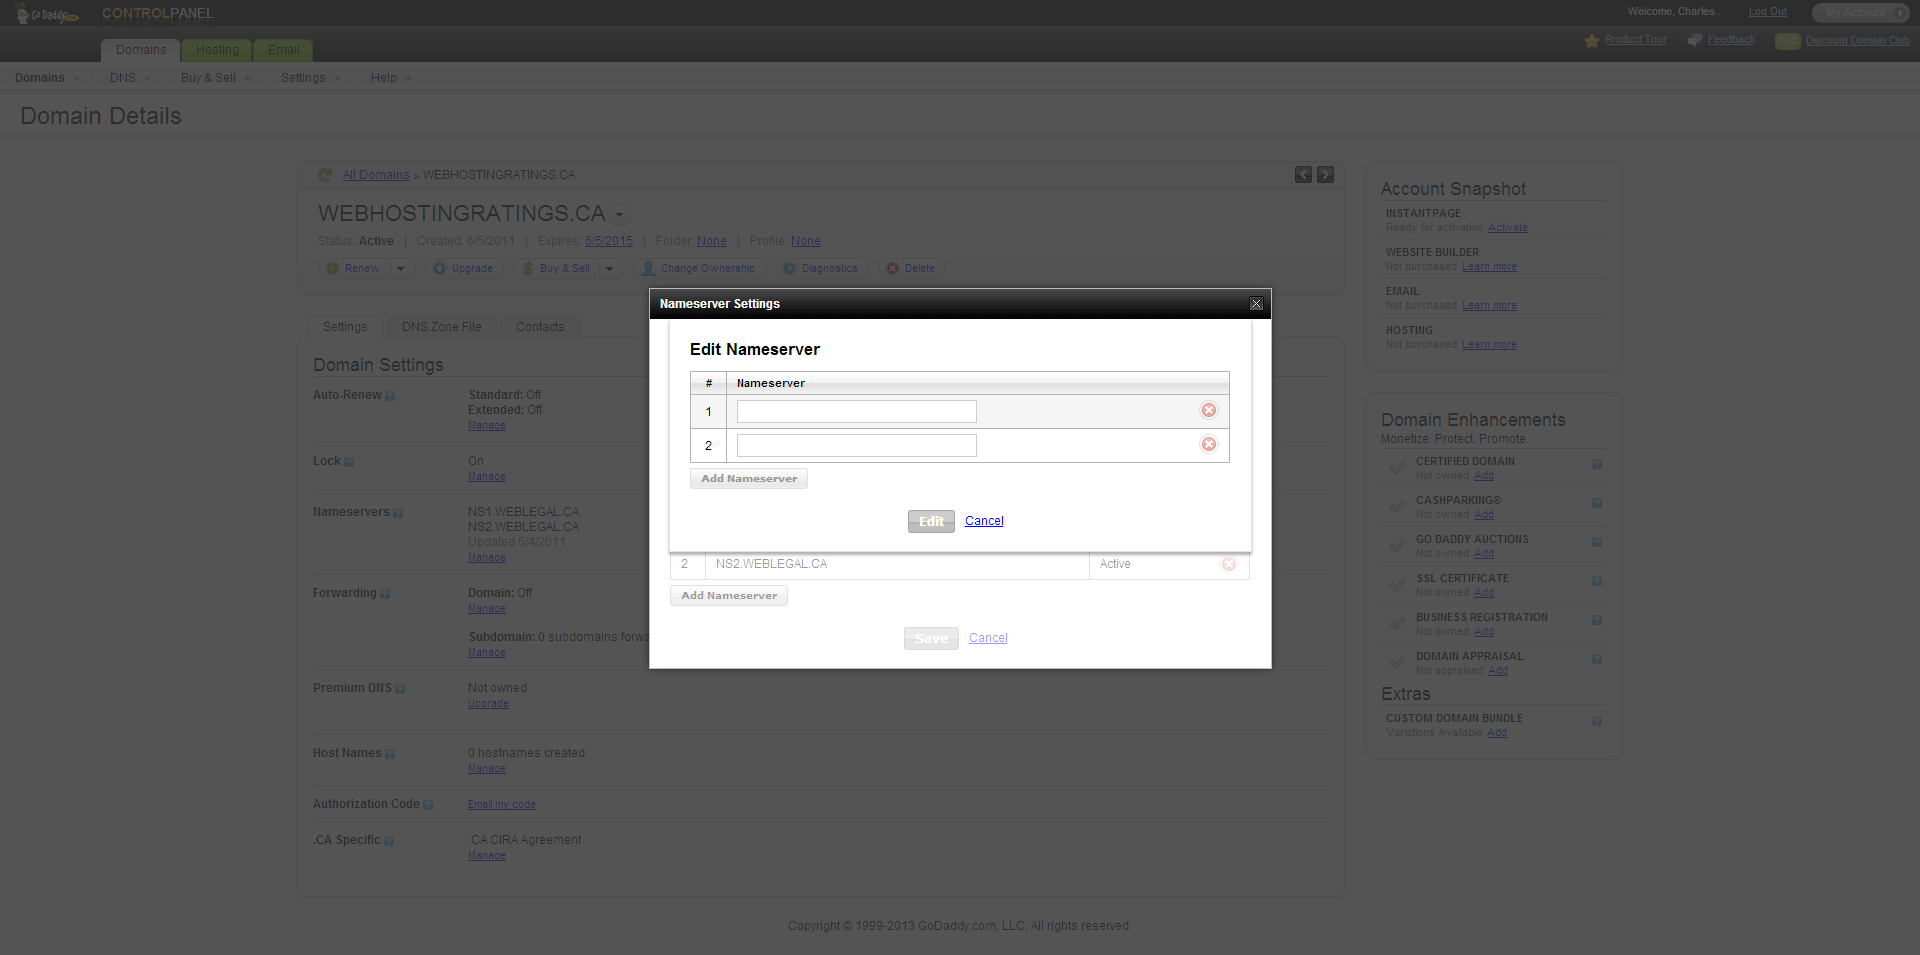
Visit GoDaddy.com again and log in using the account you used or created in order to register your domain name. Once you’re logged in, look for the “Domains” option in the middle of the page, and click on the “Launch” button that is located at the right. This will take you to you domain name management control panel.
Click on your domain name and on the next page, find the section called “Nameservers” and click on “Manage“.
A pop-up box will appear, click on “Edit Nameserver“. On the next screen, replace the listed nameservers by the ones Web Hosting Canada will have provided to you by email. (If you deleted your email, you can log into your Web Hosting Canada to retrieve them. You can also submit a “Support Ticket” to Web Hosting Canada if you are still unsure of your nameservers and cannot find the information you need from the website itself.)
Click “Edit” to confirm the changes you want to make to your nameservers. In many cases, changing nameservers can take a few hours to take full effect, so it is important to be patient during this process.
4. Installing WordPress Using cPanel and Softaculous
Creating an actual blog from scratch can be tedious and quite time consuming, especially if you do not have any previous experience with coding, programming or designing yourself. Since we want to launch a professional looking blog without the hours or weeks it may take to create the look of the site ourselves, we will be using a CMS (content management system) known as WordPress.
Why WordPress?
WordPress is one of the most well-known and popular CMS options available on the market today. Using WordPress is completely free and gives you the ability to create a blog that is complex and robust, yet simple to use. With WordPress, you can easily add other users on your blog, a commenting system, e-commerce capabilities, contact forms and so on. With thousands of free plugins and themes, truly personalizing your blog has never been easier than with the use of WordPress.
Step-By-Step Guide to Install WordPress Using Softaculous
- First, log into your new Web Hosting Canada cPanel account to gain access to your hosting features (refer to the email to find out how to log in if you forgot).
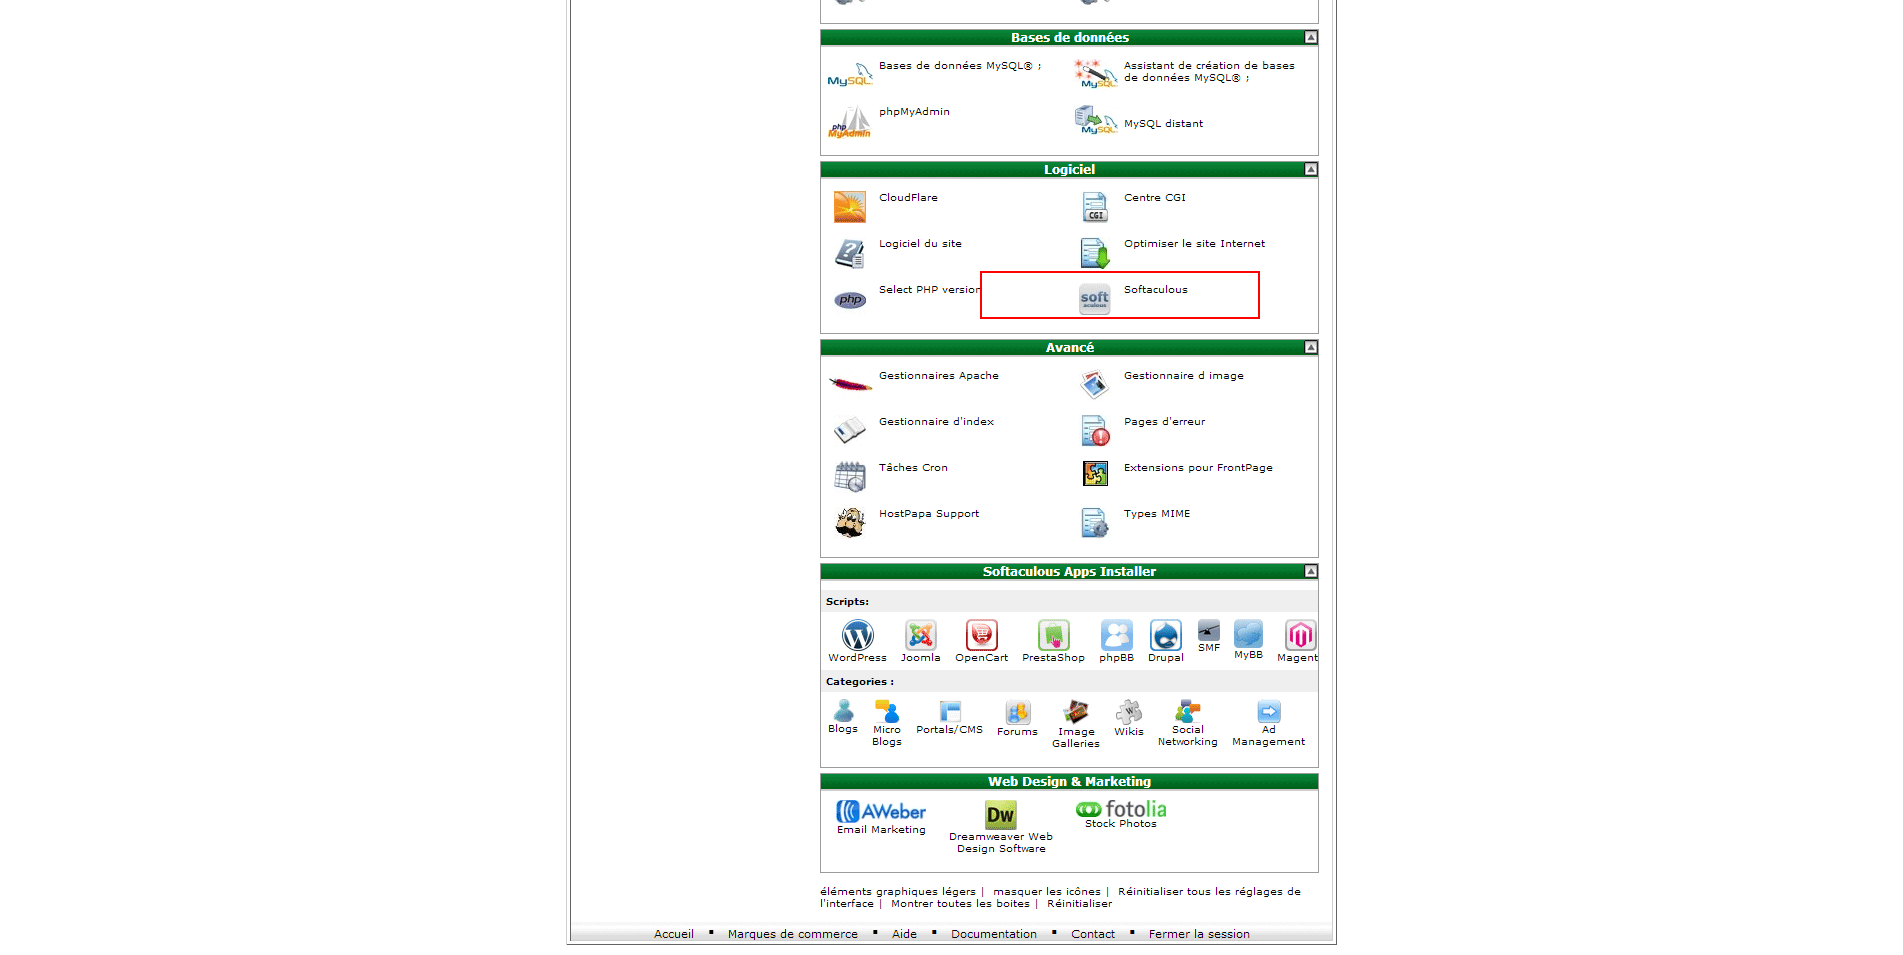
- Locate and select the “Softaculous” option, an automatic installation feature available on Hosting to install scripts and various tools without having to manually install and program the coding yourself.
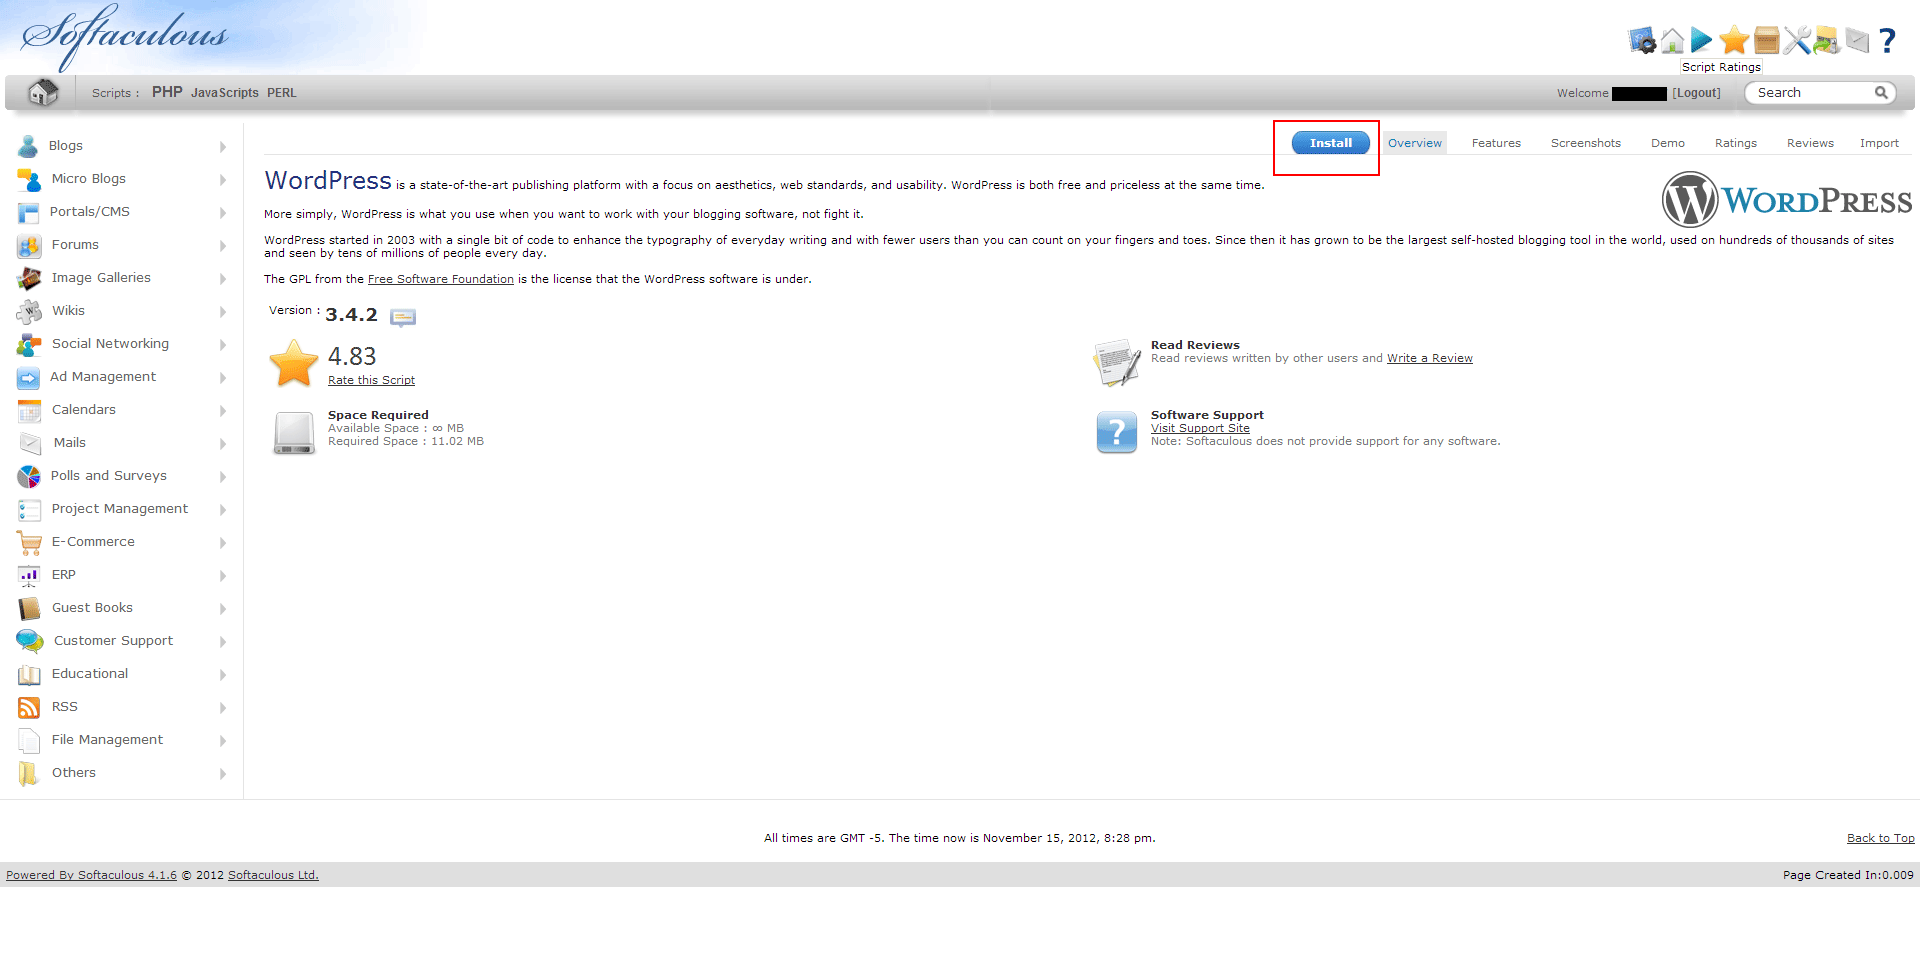
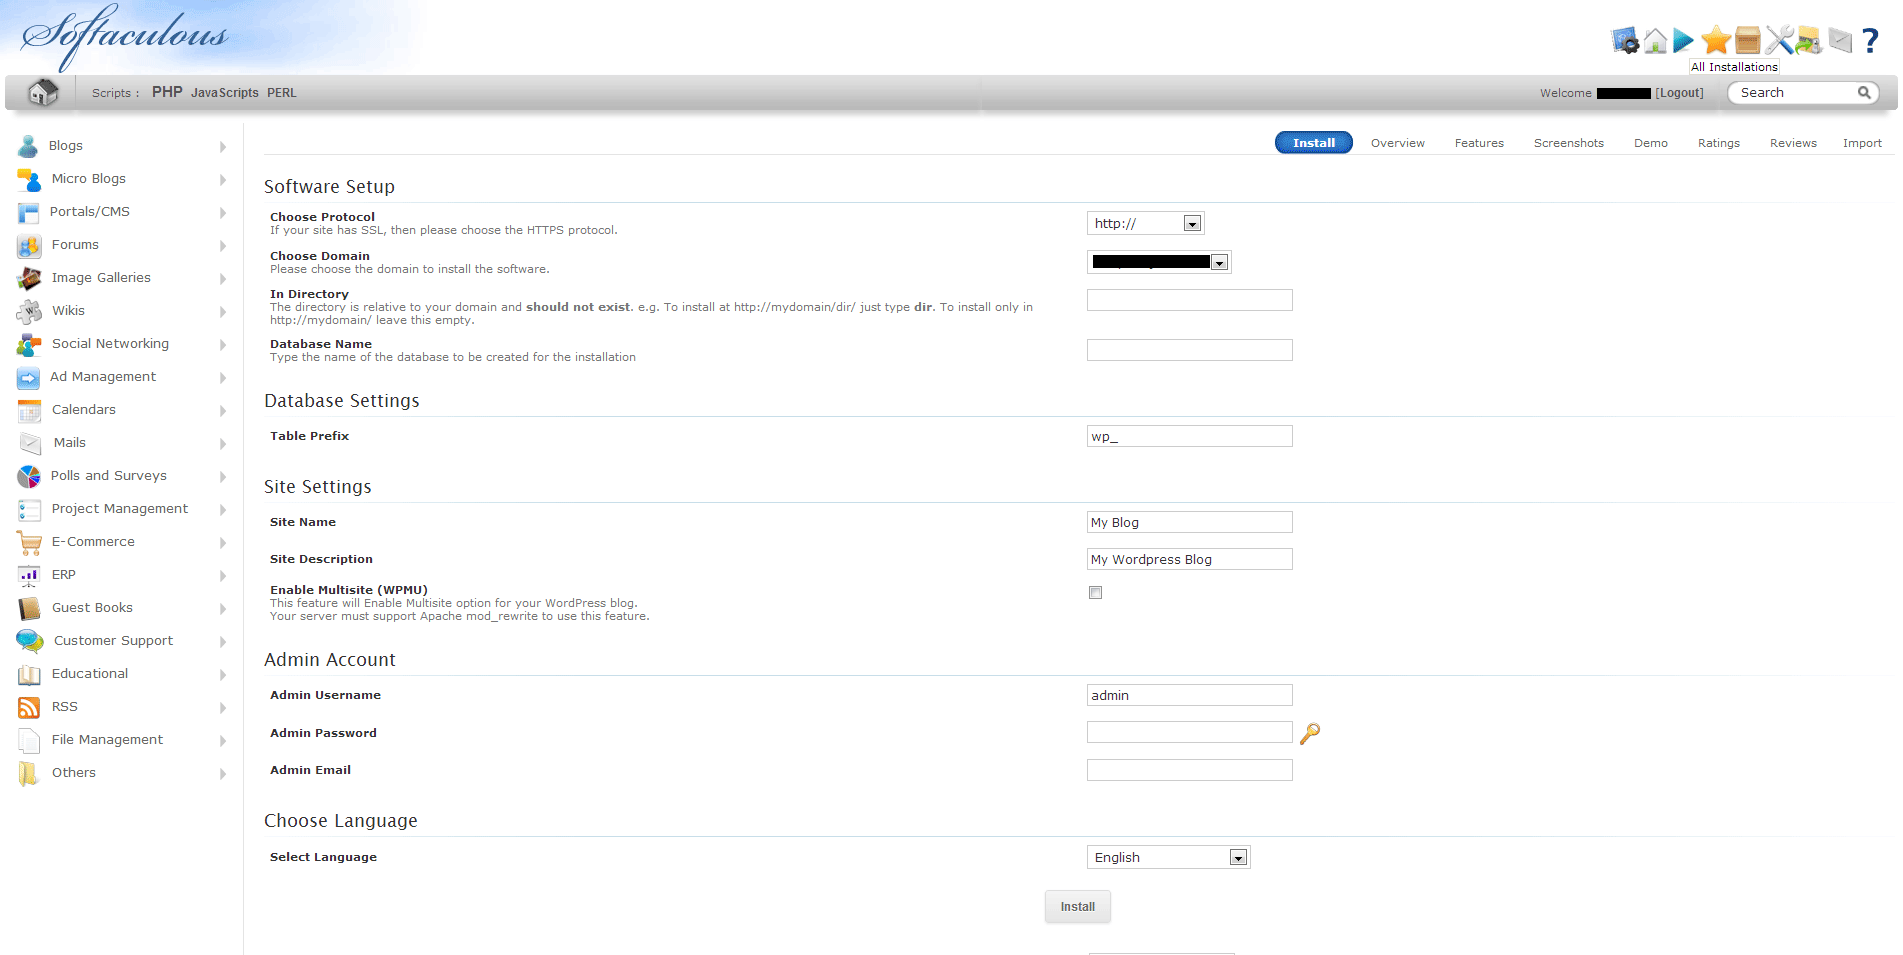
- Once Softaculous loads, you should see WordPress in the list of scripts. Select WordPress and click “Install” to begin the installation.
- Everything will already be filled in for you. You should change what is inside “In Directory“. If you want your blog to appear on your domain (www.mydomain.com), make sure that this field is completely empty. This is usually what you want. Otherwise, enter the name of the directory you want your blog to appear in (for example, www.mydomain.com/nameofdirectory/, where “/nameofdirectory” is the name of the directory. For example, “blog”.).
Make sure to also enter your “Site name” and “Site description“.
Select an “Admin Username“, “Admin Password” and “Admin Email“. These are important, make sure to remember them.
Once you have entered this information, you can click “Install“, which will prompt Softaculous to complete the installation of WordPress without requiring you to manually move and install the necessary files yourself.
After the installation is complete, you can access your WordPress blog by visiting your official website address (www.mydomain.com) or, if you installed your WordPress installation to another directory, point your domain to the proper folder (www.mydomain.com//nameofdirectory/”). When you want to view the administration panel of your WordPress blog, visit www.mydomain.com/wp-login.php or www.mydomain.com//nameofdirectory/wp-login.php depending on where you installed WordPress, and enter your Admin username and password, giving you full access to managing your site’s posts, members, comments and themes.
5. Finding the Ideal WordPress Theme
Once you have completed the installation of WordPress on your site, you can then begin to search for a theme that works for the type of blog you want to launch. Using a professional theme is highly recommended whether you are launching a personal blog, an ecommerce site or a blog that represents your business professionally.
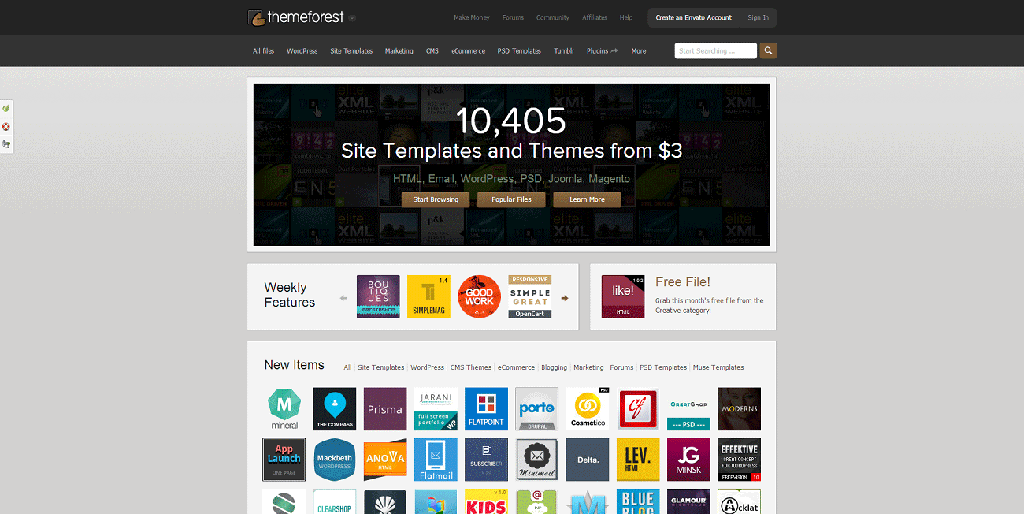
There are plenty of themes available when you begin to search online for any type of site you want to launch. Whether you are seeking a mobile-friendly layout or a magazine-themed layout for your blog, you have a wide variety of options for all types of sites. We recommend that you use ThemeForest.net to browse not only WordPress themes, but also plugins and scripts that may be premium and not made available freely on other websites.
Browsing ThemeForest for the WordPress theme you want to use will allow you to preview each theme live before you make a decision. Most themes that are made for WordPress on ThemeForest are thoroughly documented with instructions and useful tips and short codes that are useful when you want to quickly add content and information to your site in a professional and appealing way.
Comparing themes with ThemeForest is a way to test the functionality of the layouts that appeal to you along with the features each theme comes with once you make a purchase. Many themes that are made available on ThemeForest include additional plugins such as slideshows and even live galleries to browse images and graphics that you upload with ease.
Installing Your Theme
After purchasing your theme from ThemeForest, you can immediately download the theme files or entire template from the site itself or from the confirmation email you receive.
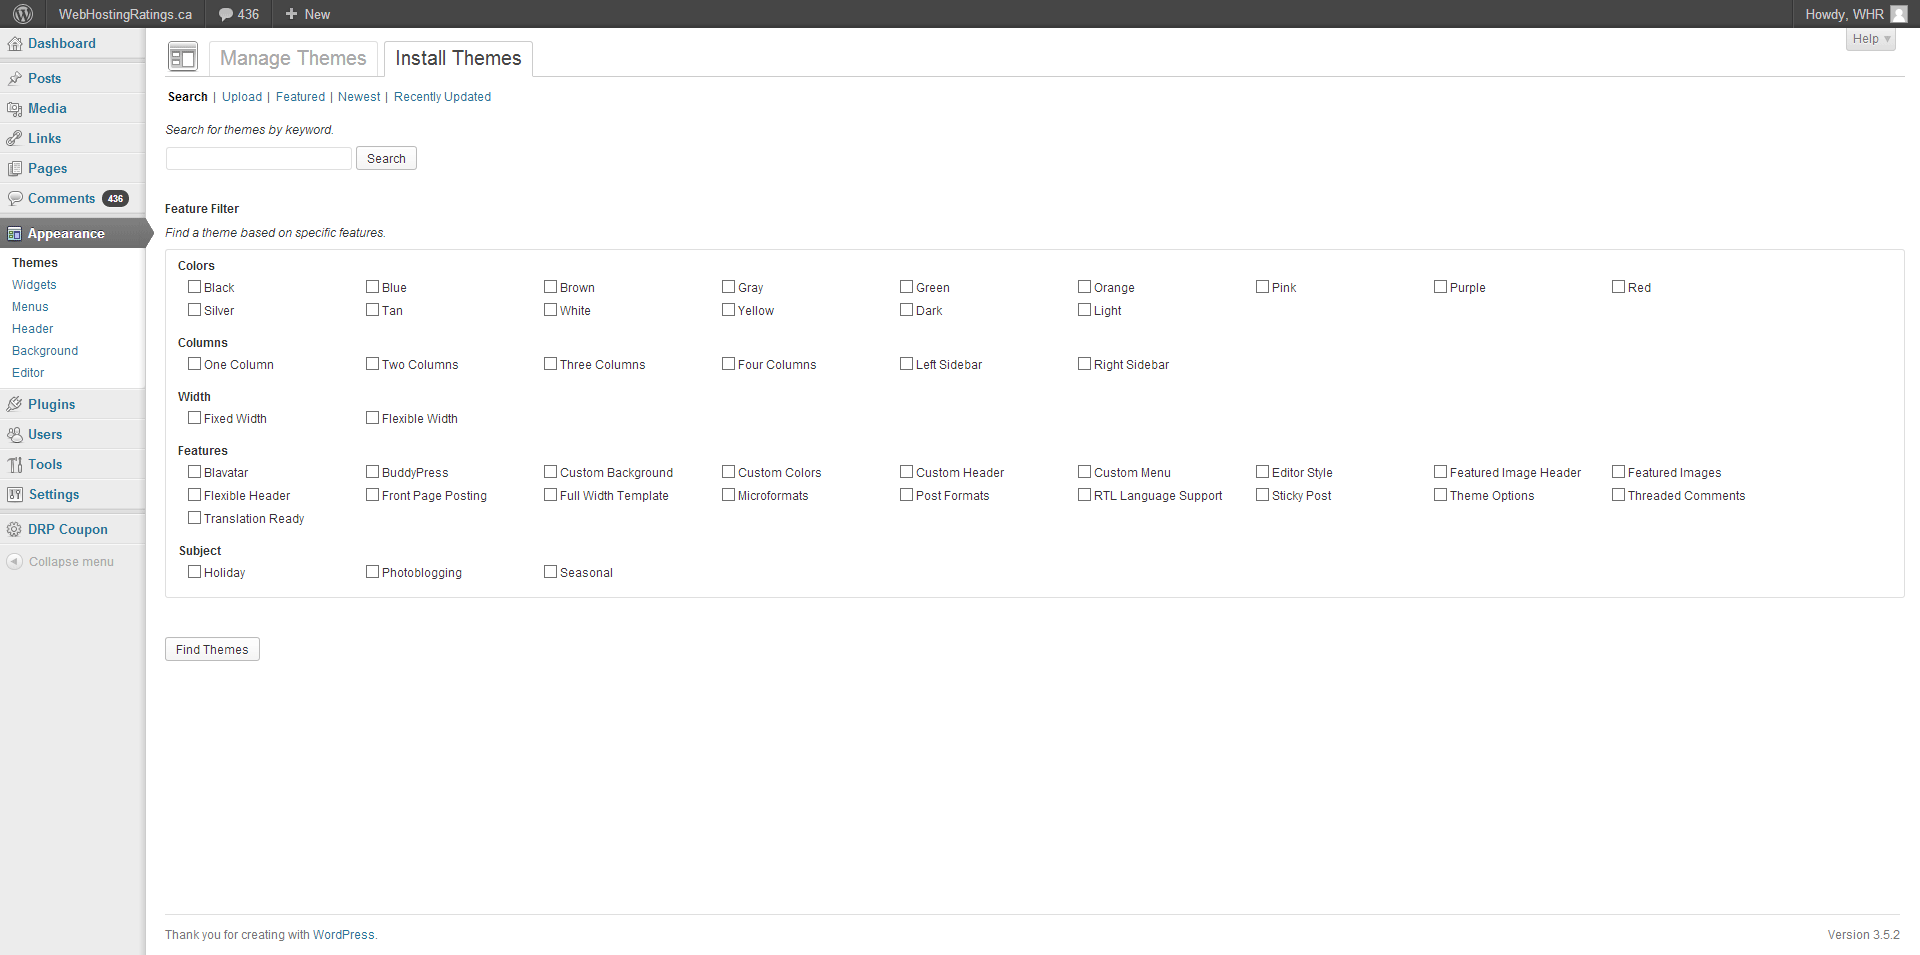
Once you are in the WordPress administration area, hover the “Appearance” tab and click “Themes” on the left side of the admin panel. Select “Install Themes” from the top tabs available in the Theme administration page. Click “Upload” to upload a theme in “.zip” format. Select “Choose File” to browse your computer’s hard drive for the downloaded .zip file of your theme. Once you locate and select the file, choose “Install Now” to complete the installation process.
You will then be taken back to the first Themes page in your admin panel, where your newly-installed theme will appear. You can select “Live Preview” to view the theme before you make it the choice for your live site. You also have the option to click “Activate“, which will immediately update your blog with the theme of your choice.
Conclusion
Your blog is now installed with its own theme. You can start adding content by publishing new posts. That said, there are more things you can and should do to optimize your blog. Read our WordPress Guide section for how tos for running a WordPress site.
Launching a blog with WordPress can be a great way to promote a business, share your personal thoughts or simply begin branding a company you have in mind. The more outlets you have online when it comes to promoting yourself professionally or the business you represent, the easier it becomes to build a positive reputation while increasing the credibility you have.


 (416) 421-3178

